Configuration
After installing Happy Hare firmware, there are some configurations you need to go through before printing in multimaterial.
Kit Users (SKR Pico)
If you built your 3MS from a kit or are using the SKR Pico board, set a starting rotation distance as shown:
Set Other Settings → Gear Stepper → Gear Ratio → 50:17
Filament Sensors
Required Sensors
To use the 3MS, you'll need a filament sensor somewhere between your Y-splitter and printer extruder.
There are two options for this sensor:
- Shared gate sensor is closer to the Y-splitter
- Extruder entry sensor is closer to the printer's extruder.
Assuming you already have one installed, you can configure it in the installer.
Extruder/Toolhead Sensors
To configure an extruder entry sensor (a sensor right before your extruder):
Don't know where to find a sensor?
If you don't know where to find a good sensor for your printer, here are a few tips:
- Search Printables and Thangs for a sensor.
- Build a Filatector universal filament sensor.
Don't know your sensor pin?
If you don't know your sensor pin, and it's already configured with Klipper, locate your sensor configuration (usually filament_switch_sensor) and note the sensor_pin.
The below video shows where to find the pin settings. Note that your pins will likely be different.
To configure your toolhead sensor (a sensor right after your extruder), set your toolhead_switch_pin the same way as you set your extruder_switch_pin.
Existing Sensors
Before moving on, ensure all your existing filament_switch_sensor and filament_motion_sensor sections are commented out or deleted. Leaving this enabled will lead to unintended issues later on.
Distances
There are many key distances to set up in Happy Hare firmware.
Parking Position
The parking position is the location your filament should park when idle, measured from your gate endstop. This should be set to ~1-2cm above your Y-splitter.
To determine this value, begin by moving the filament in gate 0 to the ideal parking position by hand.
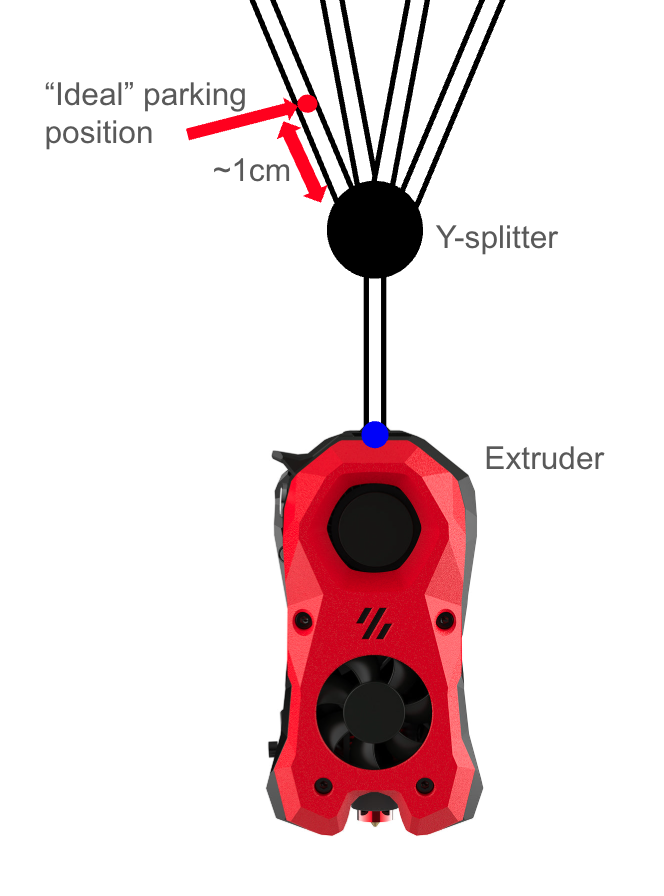
Estimate the distance from your extruder to the ideal parking position. You can use a piece of filament outside of the tube and use a ruler to help measure this. In the diagram above, it's the distance between the red and blue dots.
Save this value for configuration in the next step.
Homing Distance
Firstly, configure the maximum distance Happy Hare should attempt to load filament to the homing sensor, before "giving up" and deciding that the spool is empty. This should usually be ~150% the distance from your filament parking position to the sensor.
Eject Distance
Finally, if you want to switch out which filament is in a filament unit, edit your final eject distance. This should be the distance from your parking position to your filament unit gears, plus a small margin.
Speeds
There are a few main speeds you can configure with Happy Hare firmware.
- Homing Speed: This is when the HH moves the filament into your extruder entry sensor to ensure they are present.
- Load/Unload Speed: This is the speed at which Happy Hare will load/unload filament during a toolchange.
- Extruder Speed: This is the speed at which your extruder will load/unload filament during a toolchange.
Toolhead Distances
There are many key distances to setup in Happy Hare firmware, this time for the measurements of your toolhead.
There are three main ways to get any of the following distances:
- Recommended: Find and select your toolhead in the installer
- Find configs available online for your toolhead
- Use CAD models of your toolhead
- Measure (approximate) yourself with a piece of filament and calipers
All the below settings can be found in the Toolhead Settings section of the installer.
Homing Max
toolhead_homing_max is the maximum distance from the gate endstop to your extruder endstop HH will attempt to load filament.
This parameter is only relevant if you use both an extruder entry sensor and a shared gate sensor
Manual Configuration
If you cannot find a pre-configured toolhead, you can manually configure the distances.
There are three main parameters to measure inside your toolhead.
-
toolhead_extruder_to_nozzleThis is the distance between your extruder gears and the nozzle. If you don't have access to CAD of your printer's toolhead, you can follow the below procedure to approximate it.
- Preheat your nozzle to printing temperatures.
- Press a piece of filament up against the entrance to your extruder gears.
- Using KlipperScreen/Mainsail/Fluidd controls, load the filament in until it barely starts oozing out of the nozzle. Note the total distance traveled. This is your approximate
toolhead_extruder_to_nozzle
-
toolhead_sensor_to_nozzleThis parameter is only relevant if you have a toolhead sensor.
This is the distance between your toolhead sensor and nozzle. An easy way to approximate this is:
- Preheat your nozzle to printing temperatures.
- Press a piece of filament up against the entrance to your extruder gears.
- Using KlipperScreen/Mainsail/Fluidd controls, load the filament in until it triggers the toolhead sensor. Note the total distance traveled. Set
toolhead_sensor_to_nozzletotoolhead_extruder_to_nozzle - <MEASURED DISTANCE>
-
toolhead_entry_to_extruderThis parameter is only relevant if you have an extruder entry sensor.
This is the distance between your extruder entry sensor and extruder gears. To approximate this:
- Take a scrap of filament and slowly push it into your toolhead until the extruder entry sensor triggers.
- Brace a marker against the top of your toolhead and mark the filament.
- Push filament further in until it hits the extruder gears.
- Put another mark on the filament.
- Remove the filament and measure the distance between the two marks. This is your
toolhead_entry_to_extrudervalue.
Optional Settings
Most users likely won't have to follow the below steps, as they are automatically set on most systems.
Shared Gate Sensor
This is not required on most systems (most systems use an extruder entry sensor instead).
Moving backwards from the extruder, the next possible sensor you may have installed is a shared gate sensor. This goes right after the Y-splitter.
If you have a gate sensor installed, set your gate_switch_pin:
Pre-Gate or Post-Gear
This is not required on most systems.
Pre-gate sensors go before each of your filament units. Post-gear sensors go after each of your filament units.
Gate Homing Endstop
This is an optional step as on most systems this is automatically set.
When homing filament (checking if it is present), you have three options for the sensor to be used:
- Shared Gate Sensor Use the shared gate sensor after the Y-splitter
- Post Gate Sensors Use the individual post-gate sensors.
- Extruder Sensor Use the extruder entry sensor.
Select one of the three options. Note that only the available options will be enabled. In the below example only an extruder sensor is configured, so it is the only displayed option.
Extruder Homing Endstop
This is an optional step as on most systems this is automatically set.
Happy Hare also needs a reference sensor inside the toolhead. You have two main options for this:
- Toolhead Sensor Use the extruder entry sensor.
- Compression Sensor Use a sync-feedback sensor as a homing endstop.
- None Don't home inside the extruder.
Select one of the three options. Note that only available options will be shown depending on your setup.